How does ERS compare to IAM or RoSPA?

One of the questions I often get asked, is “How does the DVSA’s Enhanced Rider Scheme (ERS) compare to an Advanced Riding test with either IAM RoadSmart or RoSPA?”

So, I’ve put together this simple explanation to explain the similarities and differences between the three. Note that this is my understanding, based on nearly 30 years of experience as an IAM Advanced Rider, 16 years experience as a RoSPA Advanced Rider (and Instructor) and over 13 years experience as a qualified ERS trainer.

Both the IAM and RoSPA are “Advanced Riding” qualifications, and as such are based on assessing the rider’s ability to ride to the “System of Motorcycle Control” as documented in “Motorcycle Roadcraft – the Police Riders Handbook” (and incidentally, available from us as an online course.) The System, or “IPSGA” as it is sometimes called, “is a way of approaching and negotiating hazards that is methodical, safe and leaves nothing to chance. It involves careful observation, early anticipation and planning, and a systematic use of the controls to maintain your machine’s stability in all situations.”.

Both IAM RoadSmart and RoSPA are charities, and their “courses” are delivered by local groups, which are independent charities authorised to deliver courses on their behalf. All the courses are delivered by volunteer observers (IAM term) or tutors (RoSPA term), who hold an advanced riding qualification and have completed training to coach riders in advanced riding. At the end of the course, you will take a test, conducted by an independent examiner. All RoSPA Examiners are ex-Police, whereas the IAM also has examiners who have passed the IAM Masters test with Distinction and hold their National Observer qualification (I am an IAM Examiner for bikes). The tests are very similar, and look for the same thing – riding that is of a high standard (smooth, planned and progressive) and in accordance with the System. The IAM test is graded Pass or F1RST (for a consistently high standard of riding) whereas RoSPA is graded Bronze, Silver or Gold (with Gold a very high standard consistently throughout the test). The RoSPA test has to be retaken every 3 years to maintain the qualification, the IAM test doesn’t. I won’t get into the IAM Masters qualification here, as it is only available to those who have passed the IAM Advanced Riding Test.

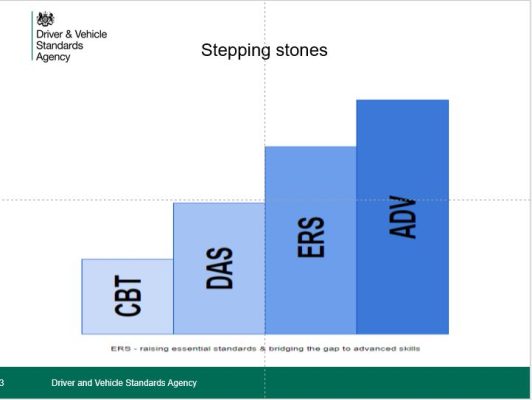
The DVSA’s Enhanced Rider Scheme is different. Originally introduced as an alternative to the IAM or RoSPA test, it has since been re-positioned as more of a stepping-stone, bridging the gap between the DVSA riding test (the one you took to get your full licence) and Advanced Riding. See the image below:

Slide from DVSA ERS update presentation 2018

The Enhanced Rider Scheme doesn’t have a test at the end, either. Instead, it starts with an assessment of your current riding, and if this is already at the standard required, then you get your certificate straight away. If there is some training required, then your ERS trainer will discuss this with you and once you successfully complete the training, you will get your certificate.

The standard is slightly different to IAM and RoSPA, in that it is not necessary to demonstrate riding to “The System of Motorcycle Control” as per Roadcraft. In practice, you will still be required to demonstrate good “Observation, Anticipation and Planning”, but will not be required, for instance, to change Position in preference to Speed, or change Gear only towards the end of the Speed phase (i.e. when most braking has been completed).

The Enhanced Rider Scheme tends to be quicker to complete, as it is delivered by professional DVSA-approved instructors (who must be on the ERS Trainers Register). With both the IAM and RoSPA, the local groups tend to have a waiting lists to get started, and as you are completing a course then taking a test at the end, it tends to take longer to complete. It is for this reason ERS is often recommended as the quickest route if you want to volunteer for Greater Manchester Blood Bikes, for who we are the Official Rider Training Partner.

It is possible to take either the IAM or RoSPA tests without first joining a local group and taking their course – for example, by using a professional advanced riding instructor such as us to get you to the required standard. This can be a quicker way to attain these qualifications.

So which is best?

Well, that depends on your objective. If you want to improve your riding, then a good place to start is the Enhanced Rider Scheme (or Police BikeSafe which will also give you a good understanding of your current level and how to improve). Then when you’ve completed that, you can progress further by taking training and an IAM or RoSPA test (either by joining a group or using a professional advanced riding instructor).

If you want to go all the way to becoming the very best road rider you can be, I would recommend taking the IAM test so that you can then take the IAM Masters programme and associated test, which in my experience is tougher than the RoSPA test, even at Gold standard.

If you want to discuss any aspect of Advanced (or Enhanced!) Riding, why not give me (Paul) a call on 07747 761059.


“Back brake? … never use it!”

Rear brake image

“Back brake? Never use it…”

That’s a comment I heard recently when taking an experienced rider out for an Enhanced Rider Scheme assessment, and it got me thinking. So many riders learnt to ride before the introduction of the current 2-part practical test with the separate module-1 and its focus on slow-speed riding control, that many have never been taught how to use the back brake effectively.

As someone who spends most of his time watching other riders, I can’t help but notice the number of riders who, when trying to ride slowly, dangle both legs, almost dragging their feet on the floor. Invariably they wobble about and then when they do come to a stop almost lose their balance as they over-use the front brake and suffer “fork bounce”.

So perhaps it’s time to look at that mysterious lever under where we rest our right foot in more detail and explore what it is for.

But before we do, let’s get one thing really clear. The front brake is the one we need to use when trying to shed a lot of speed quickly. The energy from forward motion, combined with deceleration as the bike slows down about the tyre contact patches, will compress the front forks pushing the front tyre into the ground and increasing its grip. That means we can use the more powerful front brakes to slow the bike down – by squeezing the front brake lever harder as they front tyre is pushed into the road. Using the back brake under these circumstances is likely to result in a rear-wheel lock-up and consequential skid, as the rear suspension is unloaded and the rear becomes lighter (so has less grip).

But here we are not talking about going quickly, we are discussing riding slowly – down towards a walking pace. Under these circumstances the front brake is too powerful and the compression of the forks and subsequent “bounce back” will only unsettle the bike and cause us to lose balance. It’s here the back brake becomes really useful.

Most riders know that to ride slowly they keep the throttle open slightly whilst slipping or feathering the clutch to reduce the drive to the back wheel – using the clutch as a “dimmer switch” if you like. But this only reduces drive, it doesn’t slow the bike down, and furthermore, it relies on the rider’s balance to keep the bike upright as the speed drops and the gyroscopic effect of the rotating wheels reduces. This is why many dangle their feet as they are worried about dropping the bike.

By gently dragging the back brake, though, the bike can be slowed against the forward drive – holding it back – and this will increase the bike’s stability significantly. It will, in effect, “stand up” and become less likely to wobble or fall over. This in turn will increase the rider’s confidence as he/she is no longer trying to balance the bike – it’s balancing itself!

Using the back brake in this way – to slow the bike down when riding slowly – increases the bike’s stability and that in turn enables the rider to turn the bike in a smaller space. A gentle application of the back brake during a U-turn, or when negotiating a tight turn such as a mini-roundabout or hairpin bend, will help the bike turn.

So don’t neglect that back brake lever – at slow speeds, the back brake is your best friend as applying it correctly can get you out of difficulty.

To try this for yourself, find a quiet road or car park and practice riding slowly in a straight line using just the clutch and then when using the back brake as well. Aim for about 3-4mph and see which method works best.

Soon you’ll be singing the praises of the back brake.

And no longer dangling your feet and looking like you don’t have control over your bike…

Winter Riding Tips

As the warmth of one of the best summers for years becomes a fading memory, and the cold, wet, windy weather we are more used to at this time of year becomes the norm, it’s time to remind ourselves of some basic Winter Riding advice.

The tips below have been pulled together from many years of riding through Winter. In the past I have tried putting the bike away until Spring, but the general malaise and depression that followed an enforced time away from riding means these days I ride all year round. In fact, I enjoy riding in Winter almost as much as during the summer, but for completely different reasons. In summer, it’s easy. In winter, it’s a challenge. And I like a challenge!

So here’s a few of my top tips for riding in winter. Feel free to comment and suggest your own. If you’d like someone to ride with during the winter to improve your confidence, join us on our monthly Ride Out or give us a call about some Individual Personal Training. You’ll be amazed how much you can enjoy riding when everyone else is tucked up warm and dry!

Look after #1 – stay warm and dry

This is, of course, easier said than done when the weather is at its worst. But it is not impossible with a little practice. The first rule is to layer up – several thin layers of clothing are much warmer than one thick layer and will be less restrictive too. Avoid cotton clothing as this gets cold and wet when you get warm and sweaty. Good quality base layers and mid-layers from an outdoors shop are ideal. Your outer layer should be both water and wind proof. Ensure you get fully dressed and all zips, etc are done up before leaving the house, or you’ll find the rain gets in before you even get started!

And if you’ve not yet discovered the joys of heated grips now is the time. They are simply fantastic! Electrically-heated clothing can also make a real difference to the enjoyment of being out on a really cold day!

Look after #2 – the bike!

When it’s miserable outside and you’ve just got home from the daily commute, it’s tempting to just shove the bike in the garage and head into the warmth. Then when you are ready to face the journey to work the following day, to just get the bike out and go. Don’t. The winter roads are covered in salt and grime and by the time spring comes your pride and joy will be a heap of rust. There are a couple of things you can do to help prevent this – the best by far is to use the services of All Year Biker to clean your bike and coat it in ACF50 anti-corrosion stuff. But even just rinsing the bike off every day before you put it away will make a big difference. Make sure your lights, reflectors and mirrors are clean too.

Also, remember that you still need to perform your regular pre-ride and weekly checks too. Ensure your chain is cleaned and lubricated regularly and that you check your tyre pressures and condition too. It’s all too easy to neglect the basic checks, but remember, a breakdown on a cold, wet, windy winter’s evening will be much worse than a few minutes spent checking your bike!

Ride Smooth, Stay Safe!

It goes without saying that there is less grip on the roads when they are cold and wet than when they are warm and dry. However, except for when there is ice or snow, there is still enough grip to ride so long as you are smooth with the controls. Remember that everything you do on the bike – accelerate, brake or corner – goes through the tiny contact patch between your tyres and the road surface, so treat that contact patch with care. Practice accelerating smoothly, braking gently and cornering with less aggression than in the summer – ride more relaxed. This will require planning further ahead – a skill that’s well worth developing as it will make you much safer all year round…

Plan further ahead – and keep your distance!

As above, riding smoothly is essential and this requires planning further ahead. Which in turn requires you to be able to see further ahead. Increase the distance between yourself and the vehicle in front and you’ll be astonished at how much more relaxed and smoother your riding becomes. And with that extra distance comes increased safety should you need to stop or take avoiding action.

Plan where you’re riding – watch the road surface!

Look at where you are going to be riding – what is the road surface like? Is it dull or shiny? Wet or dry? The general rule is that wet and shiny surfaces have less grip than dull, dry ones. Think wet manhole covers, dead rainbows (diesel spills), wet road markings, and even black ice. All are shiny. Try and plan where your tyres will go so that you avoid having to brake or corner on the worst surfaces, modifying your position in the road if necessary (checking it’s safe to do so first, obviously!). If you can’t avoid riding over a low-grip surface, ensure that any accelerating, braking or cornering you do is done so smoothly.

Know when to take the bus!

There are conditions when riding a motorcycle is tantamount to stupidity. When riding becomes a lottery, rather than a test of riding skill, and when it is likely other road users may lose control and cause you to have an accident. If there is snow lying on the ground, or falling blizzard-style, then riding is probably not a great idea. Even if you can stay upright and on course, it’s likely that other vehicles will be out of control and could easily take you out. Similarly, when it’s below freezing and the roads are icy, then it’s safest to leave the bike at home – we won’t train (even at advanced level) when it’s below freezing. If it’s icy, we won’t ride ourselves, either.

Stay visible!

It may not seem obvious, but most motorcycle clothing is camouflage. It’s the colour of tarmac. Now I don’t want to get into a debate about high-viz, but this seems odd to me. I would expect most motorcyclists would prefer it if car drivers could see them (yes, I know it would help if they looked!). In winter, it stays dark late and gets dark early. So most riders are riding in the dark at some stage, and whilst they ride with their lights on, this doesn’t help if they are parted from their bike as a consequence of a minor spill. Lying in the road in the dark wearing dark clothing is a great way to get run over. So think about wearing something that makes you a bit more visible and would help if you were unfortunate enough to get caught out by a change in road surface. Highly reflective clothing makes sense in the dark, and if you worry about what other bikers think of you, don’t. The ones that hate High Viz only ride in the summer, and you’re a real biker as you ride all year round!

Filtering – the “elephant in the room”

As a motorcyclist I benefit from the superior manoeuvrability of my bike and the ability to avoid being stuck in traffic for hours on end. I can perform a manoeuvre known as “filtering”, which is where I travel in between lines of queueing or slow-moving traffic. But when it comes to teaching people to ride, filtering is the “Elephant in the Room“. It is rarely discussed in detail, and learner riders are discouraged from filtering until they have passed their test and gained some experience. The reason for this is simple – filtering is very dangerous and the advice is therefore not to do it.

But that’s ignoring the Elephant in the room.

Filtering is what we do when we encounter queues, because we can. It’s not illegal and it’s one of the benefits of being on a bike. And if you’ve only done your CBT and commute on a 125, you’re going to filter anyway, right?

So isn’t it time we discussed how to filter safely in more detail?

I think so, so here’s my take on it.

First and foremost, safety is paramount and so filtering should only be considered when it is safe to do so and when there is likely to be a real benefit from it. It should not be a habit – every time you see a two or more lanes of queuing traffic requires a considered decision to filter or not – don’t automatically enter the ‘filtering lane’ between the queues or you’re likely to get yourself into bother.

For each situation:

  • Evaluate the risks – are you sure the traffic isn’t about to start moving again, leaving you stuck in the middle looking for an escape route?
  • Evaluate the benefit – can you really make sufficient additional progress over and above sitting more safely in the queue?
  • Have a clear goal in mind – can you safely get to the front, or to where you can safely re-join the traffic?

Only when you have weighed up the above should you begin filtering. Then, as you proceed along the ‘filtering lane’ between the rows of queuing cars:

  • Keep your speed low – you need to be able to stop in a short distance if something unexpected happens, like a passenger or driver deciding to get out of a car as you ride past (it happens, and they won’t expect you to be coming alongside!). As a guide, no more than 10mph faster than the traffic in the queue and no more than 30mph max – at which speed you should rejoin the normal traffic flow.
  • Keep scanning with your eyes – looking for clues as to what might happen, drivers starting to move off, or looking to change lanes, front wheels changing angle, gaps opening up inviting the lane-changers, gaps closing as drivers weave from side to side (I often see people steering with their knees whilst texting or reading the paper!)
  • Keep you options open – look for gaps opening where you can re-join the queue should the traffic begin moving freely again. Be flexible and be prepared to drop back into the queue when the situation changes
  • Don’t forget your mirrors – watch out for someone filtering faster than you, move over and let them past, they’ll help move the cars aside for you (assuming they don’t have an accident by going too quickly!)

Note that ‘filtering’ is different to ‘overtaking’. Filtering is between lanes of traffic, Overtaking is to the right or left of traffic (i.e. not in-between it).

When overtaking queues of traffic the additional risk is that the vehicle being overtaken may suddenly and without warning move into your path. It is not uncommon for drivers who have been sat in a queue to give up and perform a U-turn without first looking for anyone overtaking them (as they won’t be expecting it, given they are sat in a queue that’s not going anywhere!). So only overtake if you have a clear idea of where you will return to your normal riding position and keep your speed low so you can stop if necessary – and keep your eyes peeled for someone abandoning the queue or getting out of their vehicle to see what is causing the queue!

What the Highway Code says about filtering:

Rule 88:

Manoeuvring. You should be aware of what is behind and to the sides before manoeuvring. Look behind you; use mirrors if they are fitted. When in traffic queues look out for pedestrians crossing between vehicles and vehicles emerging from junctions or changing lanes. Position yourself so that drivers in front can see you in their mirrors. Additionally, when filtering in slow-moving traffic, take care and keep your speed low.

Remember: Observation – Signal – Manoeuvre.

Rule 167:

DO NOT overtake where you might come into conflict with other road users. For example

  • approaching or at a road junction on either side of the road
  • where the road narrows
  • when approaching a school crossing patrol
  • between the kerb and a bus or tram when it is at a stop
  • where traffic is queuing at junctions or road works
  • when you would force another road user to swerve or slow down
  • at a level crossing
  • when a road user is indicating right, even if you believe the signal should have been cancelled. Do not take a risk; wait for the signal to be cancelled
  • stay behind if you are following a cyclist approaching a roundabout or junction, and you intend to turn left
  • when a tram is standing at a kerbside tram stop and there is no clearly marked passing lane for other traffic.

A Fighter Pilot’s Guide to Surviving on the Roads

As part of our “Improve Your Road Riding Skills” level 1 course we look at the System of Motorcycle Control that is at the heart of advanced riding. The first phase of this system is concerned with Information – the taking, using and giving of information to help form a riding plan. When researching ways to explain to riders how we take information in, particularly visual information, I encountered this excellent article written by John Sullivan.

John is a fighter pilot and keen cyclist. He’s also a motorcyclist so understands the situations we encounter and in particular the SMIDSY – the classic “Sorry Mate, Didn’t See You” type of accident where a driver pulls out in front of an unsuspecting motorcyclist. He used his knowledge of how fighter pilots are trained to spot enemy aircraft in the vast, featureless expanse of sky to pull together some thought provoking advice for his fellow cyclists and motorcyclists.

I’ve now used his ideas many times when teaching others, as well as helping to improve my own observation skills. I recommend you get a brew on, sit down and read this article several times. Then think long and hard about how you are looking but not seeing as much as you thought! And spare a thought for that poor motorist making the SMIDSY mistake – they looked but didn’t see either. So should you really be “unsuspecting”?

Road Survival Guide

Summer Rain, Slippery Roads

With the long period of half-decent weather bringing many more bikes out onto the roads, it’s probably time to remind riders of the dangers posed by summer rain. By danger, I’m not referring to the need to carry waterproofs, or the dangers of soggy underwear after being caught without, I’m referring to what happens to the road surface when it rains after a long period of dry weather.

Simply, it becomes similar to a skating rink.

During the long, hot, dry days, all the traffic is depositing rubber onto the road as vehicle tyres wear whilst giving their vehicles good grip. In addition, the diesel spilt by over-filled lorry tanks and dripping oil from badly maintained vehicles will seep into the tarmac just waiting to be brought to the surface when the rain comes. Unlike petrol, diesel and oil doesn’t evaporate, so will sit there, just below the surface, waiting to pop up and make pretty rainbow patterns when water is added.

All the while, we as riders are enjoying the feeling of almost infinite grip, getting greater angles of lean on bends, counter-steering more aggressively, braking later and accelerating harder. In other words, having fun!

Then comes the inevitable downpour.

Which brings the rubber and diesel to the surface, making the roads very slippery indeed. The painted white lines and other road markings return to their winter state of being things to avoid. Manhole covers, bitumen banding and polished surfaces become slippery once more.

Now the rider needs to be extra careful. The sudden change means no more hard acceleration or braking, no more aggressive cornering. Cautious riding round roundabouts instead of seeking hero-like lean angles. Eagle eyes on the search for tell-tale rainbows on the road warning of ice-like diesel spills.

Summer rain makes the roads more treacherous than the frequent rains of winter – when the rubber and diesel is washed away and not allowed to build up to catch us unaware. So riding in summer after a downpour requires even more care than riding in winter.

Be warned – Summer Rain means Slippery Roads!


Keep it Simple!

Recently I had a discussion with one of our trainees whilst helping him through his Compulsory Basic Training, or CBT as it’s more commonly known. We had just completed part of the 2-hour road ride and were stopped at the roadside discussing how things had been going.

He told me he was finding if very difficult as there was too much to think about, too many things going on and he was worried that he wouldn’t remember all of the things he should be looking out for.

This is not an uncommon concern, especially for new riders who are using the roads in charge of a motorised vehicle travelling “at speed” (30mph feels really fast when you first start out!) for the first time. The problem is that there are so many different things the rider needs to pay attention to – manholes, potholes, pedestrians, buses, cars, white vans, traffic lights, side-winds, cyclists, other motorcyclists, speed humps, road signs, speed limits,  junctions, roundabouts, etc, etc, etc. The list is endless.

But it really is very simple. There are only 3 things you need to pay attention to – Signs, Lines and Hazards.

Let me explain.

Road Signs and Road Markings (Lines) tell you where you should position your motorcycle and the maximum permitted speed and, in the absence of any Hazards,  that’s all you would need to know in order to get where you are going legally and safely.

Hazards are what may cause the rider to need to change speed or position from their intended course.

Hazards are “anything that is potentially dangerous” and they come in 3 types :

  • Physical features – such as junctions, roundabouts, bends or hill crests
  • Other road users – their position and movement
  • Environmental – variations in road surface, weather conditions and visibility

So, all you have to do is ride along looking for signs and lines to tell you where you would ideally position your bike and the speed you would travel at, then look for hazards and modify your speed and position accordingly.

Simple!

Except of course that in practice it’s not – there are an almost infinite number of different individual hazards and developing good hazard perception skills is essential to safe riding.

But knowing that there are only 3 things to think about – Signs, Lines and Hazards – enables the rider to concentrate on what is important – observing, planning and acting on hazards.

(c) Paul Beattie, RoSPA (Dip), Chief Instructor at Inner Circle Training Ltd.

Pre-Flight Checks?

Imagine the following scenario.

You are about to fly off on a much-needed holiday to the sun. You have boarded the plane, stowed your luggage in the overhead bin, fastened your seatbelt and started to flick through the in-flight manual looking for the list of the films that will be playing. Over the loudspeaker comes the pilot. He’s out of breath, panting as he explains – “Sorry for the… err…delay folks… only my kids were late getting up this morning, then the cat puked on the carpet, my car wouldn’t start and the traffic was… awful. So I’m running a bit behind… would anyone object if I skipped the pre-flight checks and we just took off?”

What would your reaction be?

If, like me, you’d probably say “Whoa, hold on a minute! Just run through the checks and we’ll just take off a few minutes late!”

Why is that? I suspect it’s because we don’t want anything to go wrong with the plane because we’d die.

Now switch to you leaving your house to go out riding your bike. What pre-ride checks do YOU do?

Why?

The risk of dying if something were to go wrong with your bike is probably not as high as the plane example, but it is still likely that you’d get hurt. So a simple, 2-minute pre-ride check would be worth it, surely?

Now here’s a simple way to remember those checks – and trust me, they won’t take more than 2 minutes. And they could save you a great deal of pain!

For the machine checks, remember POWDERS:

Petrol – do I have enough or will I need to stop? (don’t want to start an overtake only to find I run out part-way past!)

Oil – a simple glance at the sight-glass (if the bike has one) and a check for leaks around the engine and brake hoses

Water – if the bike is water-cooled, check for leaks and a glance at the level in the expansion bottle will suffice

Damage/Drive – check nothing has worked loose and check the chain is oiled (a dry chain can snap!)

Electrics – switch on the ignition and check lights, indicators and horn (bearing in mind Highway Code rule 112!

Rubber – quick check of the tyres, looking for embedded objects and any sign of damage (see notes below)

Steering/Suspension – quick check the steering moves freely from lock-to-lock and the suspension isn’t leaking

Notes – these are the minimum pre-ride checks, you should still frequently check oil levels, tyre pressures, etc more thoroughly!

But don’t forget to check you are ready to ride too – remember I’M SAFE!

Infection – I’m not ill and unfit to ride!

Medication – if I’m taking any, I need to ensure it won’t make me drowsy or unfit to ride

Sleep – I need to ensure I’m adequately rested – don’t want to fall asleep at the bars!

Alcohol – riding under the influence is a no-no!

Food – am I likely to be distracted by my belly rumbling?

Emotion – I don’t want to ride unless my mind is fully on the job, so best avoid riding angry!

Hopefully these 2 simple words – POWDERS and I’M SAFE – will help you remember to do your pre-ride checks, you never know, they could save your life!